Pages

Monday, December 29, 2008

Coherence with ADF BC ( BC4J)

Inspired by an article of Clemens I decided to make my own very fast and easy ADF BC Coherence example project ( I use in this project the HR schema tables ). This Jdeveloper 11g project is a bit different then that of Clemens. I will use not a local cache and I will use a JPA provider to fill the Coherence cache. Clemens uses an entity to fill the cache. In my case the JPA Toplink ( eclipselink) provider fills the cache. The ADF BC viewobjects reads this cache and the transactions are handled by the ADF BC entities ( my own EntitiyImpl updates or add the cache entries).
It is now very easy to use coherence with ADF BC, you don't need to program java or know much about coherence. There are only five steps to make it work.
Step 1, create an EJB entity
Step 2, change the coherence configuration xml where we will add the new entity and start Coherence on 1 or more servers
Step 3, Create an ADF BC entity ( same attributes and java types as the EJB entity ) and override the row entity class.
Step 4, Create on the just created entity a new default view and override the viewobject object.
Step 5, Fill the cache and start the ADF BC Web Application
That's all.
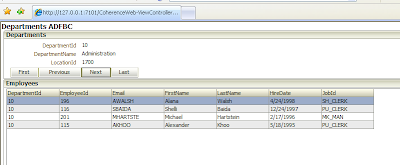
Here is an picture of an ADF page where I use the coherence viewobjects and I also support ADF BC master detail relation ( viewlinks)
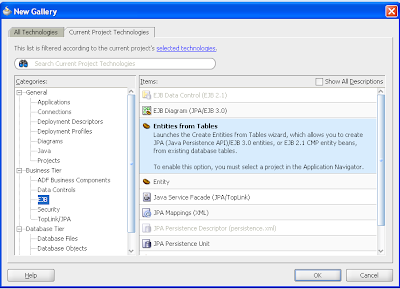
We start by adding a new EJB entity.


Create a new persistence unit, This name must match with the coherence configuration xml
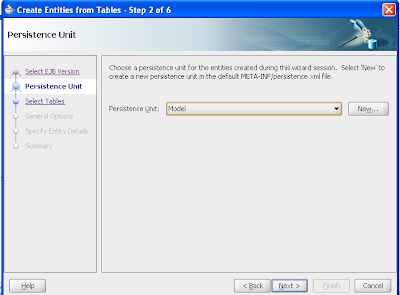
Select only one table a time, else the foreign key attributes will be replaced by relation classes

We need to change the persistence xml and add some extra jdbc properties. Coherence won't use the datasource so we need to add eclipselink.jdbc properties. Change my values with your own database values.
<?xml version="1.0" encoding="windows-1252" ?>
<persistence xmlns:xsi="http://www.w3.org/2001/XMLSchema-instance"
         xsi:schemaLocation="http://java.sun.com/xml/ns/persistence http://java.sun.com/xml/ns/persistence/persistence_1_0.xsd"
         version="1.0" xmlns="http://java.sun.com/xml/ns/persistence">
<persistence-unit name="Model">
<provider>org.eclipse.persistence.jpa.PersistenceProvider</provider>
<jta-data-source>java:/app/jdbc/jdbc/hrDS</jta-data-source>
<class>nl.whitehorses.coherence.model.Departments</class>
<class>nl.whitehorses.coherence.model.Employees</class>
<properties>
  <property name="eclipselink.target-server" value="WebLogic_10"/>
  <property name="javax.persistence.jtaDataSource"
            value="java:/app/jdbc/jdbc/hrDS"/>
  <property name="eclipselink.jdbc.driver"
            value="oracle.jdbc.OracleDriver"/>
  <property name="eclipselink.jdbc.url"
            value="jdbc:oracle:thin:@localhost:1521:ORCL"/>
  <property name="eclipselink.jdbc.user" value="hr"/>
  <property name="eclipselink.jdbc.password" value="hr"/>
</properties>
</persistence-unit>
</persistence>

Download coherence from Oracle and put my start script and my coherence configuration file in the bin folder of coherence home
here is my configuration xml, Where I add for every ejb entity a new cache-mapping. If I add the ejb entities under the same package name and use the same persistence unit I can use the same distributed-scheme.
<?xml version="1.0" encoding="windows-1252" ?>
<cache-config>
<caching-scheme-mapping>
<cache-mapping>
<cache-name>Employees</cache-name>
<scheme-name>jpa-distributed</scheme-name>
</cache-mapping>
<cache-mapping>
<cache-name>Departments</cache-name>
<scheme-name>jpa-distributed</scheme-name>
</cache-mapping>
</caching-scheme-mapping>
<caching-schemes>
<distributed-scheme>
<scheme-name>jpa-distributed</scheme-name>
<service-name>JpaDistributedCache</service-name>
<backing-map-scheme>
  <read-write-backing-map-scheme>
    <internal-cache-scheme>
      <local-scheme/>
    </internal-cache-scheme>
    <cachestore-scheme>
      <class-scheme>
        <class-name>com.tangosol.coherence.jpa.JpaCacheStore</class-name>
        <init-params>
          <init-param>
            <param-type>java.lang.String</param-type>
            <param-value>{cache-name}</param-value>
          </init-param>
          <init-param>
            <param-type>java.lang.String</param-type>
            <param-value>nl.whitehorses.coherence.model.{cache-name}</param-value>
          </init-param>
          <init-param>
            <param-type>java.lang.String</param-type>
            <param-value>Model</param-value>
          </init-param>
        </init-params>
      </class-scheme>
    </cachestore-scheme>
  </read-write-backing-map-scheme>
</backing-map-scheme>
<autostart>true</autostart>
</distributed-scheme>
</caching-schemes>
</cache-config>

Add these parameters to run options of the model and viewcontroller project.
-Dtangosol.coherence.distributed.localstorage=false -Dtangosol.coherence.log.level=3 -Dtangosol.coherence.cacheconfig=d:\oracle\coherence\bin\jpa-cache-config-web.xml
Now JDeveloper knows where to find the coherence the cache.

Create an new entity with the same name as the ejb entity and don't select a schema object. We will add our own attributes to this ADF BC entity.
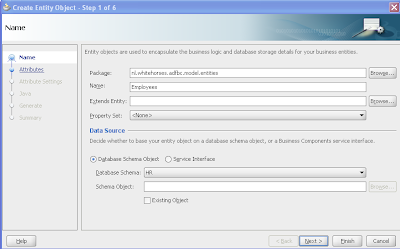

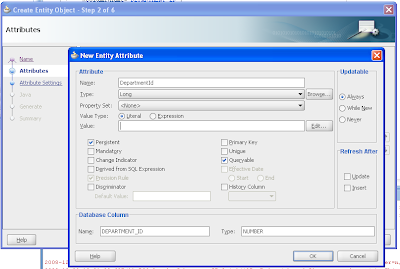
Add at least all the mandatory attributes to this entity. These attributes needs to have the same name and java type as the ejb entity.
When we are finished we can create a new default view
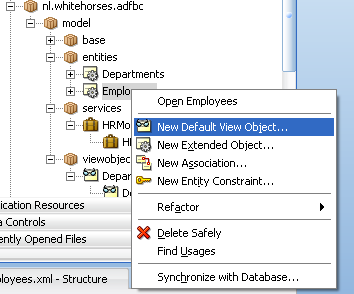
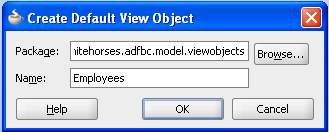


I created a new EntityImpl ( Inspired by the great work of Steve and Clemens). This EntityImpl has it's own doDML. In this method I use reflection to dynamically update or add entries to the Coherence Cache.
package nl.whitehorses.adfbc.model.base;

import com.tangosol.net.CacheFactory;
import com.tangosol.net.NamedCache;

import java.lang.reflect.Method;

import oracle.jbo.AttributeDef;
import oracle.jbo.server.EntityImpl;
import oracle.jbo.server.TransactionEvent;

public class CoherenceEntityImpl extends EntityImpl {


    protected void doSelect(boolean lock) {
    }

    protected void doDML(int operation, TransactionEvent e) {

        NamedCache cache =
            CacheFactory.getCache(this.getEntityDef().getName());

        if (operation == DML_INSERT || operation == DML_UPDATE) {

            try {
                Class clazz =
                    Class.forName("nl.whitehorses.coherence.model." + this.getEntityDef().getName());
                Object clazzInst = clazz.newInstance();
                AttributeDef[] allDefs =
                    this.getEntityDef().getAttributeDefs();
                for (int iAtts = 0; iAtts < allDefs.length; iAtts++) {
                    AttributeDef single = allDefs[iAtts];
                    Method m =
                        clazz.getMethod("set" + single.getName(), new Class[] { single.getJavaType() });
                    m.invoke(clazzInst,
                             new Object[] { getAttribute(single.getName()) });
                }
                cache.put(getAttribute(0), clazzInst);
            } catch (Exception ee) {
                ee.printStackTrace();
            }
        } else if (operation == DML_DELETE) {
            cache.remove(getAttribute(0));
        }
    }

}

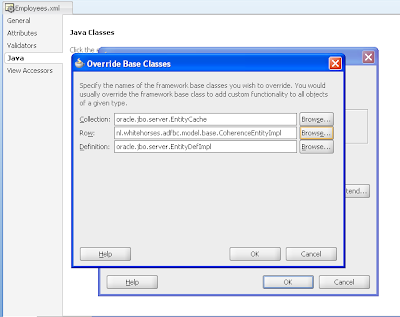
Override the just create ADF BC Entity with this EntityImpl
Here is the ViewObjectImpl I use to override the Viewobjects
package nl.whitehorses.adfbc.model.base;

import com.tangosol.net.CacheFactory;
import com.tangosol.net.NamedCache;
import com.tangosol.util.ConverterCollections;
import com.tangosol.util.Filter;
import com.tangosol.util.filter.AllFilter;
import com.tangosol.util.filter.EqualsFilter;

import com.tangosol.util.filter.IsNotNullFilter;

import java.lang.reflect.Method;

import java.sql.ResultSet;

import java.util.ArrayList;
import java.util.HashMap;
import java.util.Iterator;
import java.util.List;
import java.util.Map;
import java.util.Set;

import oracle.jbo.AttributeDef;
import oracle.jbo.Row;
import oracle.jbo.ViewCriteria;
import oracle.jbo.common.Diagnostic;
import oracle.jbo.server.AttributeDefImpl;
import oracle.jbo.server.ViewObjectImpl;
import oracle.jbo.server.ViewRowImpl;
import oracle.jbo.server.ViewRowSetImpl;

public class CoherenceViewObjectImpl extends ViewObjectImpl {


    private NamedCache cache;
    private Iterator foundRowsIterator;

    /**
     * executeQueryForCollection - overridden for custom java data source support.
     */
    protected void executeQueryForCollection(Object qc, Object[] params,
                                             int noUserParams) {

        cache = CacheFactory.getCache(this.getViewDef().getName());

        List filterList = new ArrayList();
        Set foundRows = null;
        
        // get the currently set view criteria
        ViewCriteria vc = getViewCriteria();
        if (vc != null) {
            Row vcr = vc.first();
            // get all attributes and check which ones are filled
            for (AttributeDef attr : getAttributeDefs()) {
                Object s = vcr.getAttribute(attr.getName());
                if (s != null && s != "") {
                    // construct an EqualsFilter
                    EqualsFilter filter =
                        new EqualsFilter("get" + attr.getName(), s);
                    // add it to the list
                    filterList.add(filter);
                }
            }
        } else if  (params != null && params.length > 0) {
            for ( int i = 0 ; i < params.length ; i++  ) {
                Object[] s = (Object[])params[i];
                // construct an EqualsFilter
                String attribute = s[0].toString();
                attribute = attribute.substring(5);
                EqualsFilter filter = new EqualsFilter("get" + attribute, s[1]);
                // add it to the list
                filterList.add(filter);
                   
            }
        }
        if (filterList.size() > 0) {
          // create the final filter set, with
          // enclosing the single filters wit an AllFilter
          Filter finalEqualsFilterArray[] =
                    (EqualsFilter[])filterList.toArray(new EqualsFilter[] { });
          AllFilter filter = new AllFilter(finalEqualsFilterArray);
          foundRows = cache.entrySet(filter);
        } else {
              IsNotNullFilter filter =  new IsNotNullFilter("get"+this.getAttributeDef(0).getName());
              foundRows = cache.entrySet(filter);
        }
        setUserDataForCollection(qc, foundRows);
        
        ConverterCollections.ConverterEntrySet resultEntrySet =
            (ConverterCollections.ConverterEntrySet)getUserDataForCollection(qc);
        foundRowsIterator = resultEntrySet.iterator();

        super.executeQueryForCollection(qc, params, noUserParams);
    }

    protected boolean hasNextForCollection(Object qc) {

        boolean retVal = foundRowsIterator.hasNext();
        if (retVal == false) {
            setFetchCompleteForCollection(qc, true);
        }
        return retVal;
    }


    /**
     * createRowFromResultSet - overridden for custom java data source support.
     */
    protected ViewRowImpl createRowFromResultSet(Object qc,
                                                 ResultSet resultSet) {

        ViewRowImpl r = createNewRowForCollection(qc);
        AttributeDefImpl[] allDefs = (AttributeDefImpl[])getAttributeDefs();
        Map.Entry entry = (Map.Entry)foundRowsIterator.next();
        // loop through all attrs and fill them from the righ entity usage
        Object dynamicPojoFromCache = entry.getValue();
        Class dynamicPojoClass = dynamicPojoFromCache.getClass();
        for (int iAtts = 0; iAtts < allDefs.length; iAtts++) {
            AttributeDefImpl single = allDefs[iAtts];
            try {
                Method m =
                    dynamicPojoClass.getMethod("get" + single.getName(), new Class[] { });
                Object result = result = m.invoke(dynamicPojoFromCache, null);
                // populate the attributes
                super.populateAttributeForRow(r, iAtts, result);
            } catch (Exception e) {
               e.printStackTrace(); 
            }
        }
        return r;
    }


    public long getQueryHitCount(ViewRowSetImpl viewRowSet) {
       if (viewRowSet.isFetchComplete()) {
          return viewRowSet.getFetchedRowCount();
       }
       Long result;
       if ( cache != null) {
           result = Long.valueOf(cache.size());
       } else {
           cache = CacheFactory.getCache(this.getViewDef().getName());
           result = Long.valueOf(cache.size());
       }
       return result;
    }


}

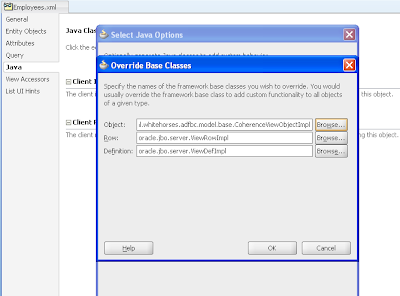
Override the viewobject with this ViewObjectImpl
That's all.
Here is the JDeveloper 11gR2 example on github
https://github.com/biemond/jdev11gR2_examples/tree/master/Coherence_ADF_BC

Important,

download coherence at otn and put the jars in the coherence\lib folder.
Rename the internal coherence folder of jdeveloper else you can't connect to the cache.

Update the project options with your own coherence settings, also the weblogic run options of the application.

And Start Coherence and fill the coherence cache before running.

Wednesday, December 24, 2008

Reuse remote Task Flows

In JDeveloper 11g is possible reuse pages in different applications. For example you can make one registration process which you can use in your all applications. If you breakup your application in reusable parts you can use these parts in all your applications, this will reduce maintenance and lower the complexity of your application because you now have small applications which has only one purpose. These parts must be bounded Task Flows and must contain at least one view and a Task Flow return component. We can deploy this TF to an application server and call this TF from your application. You will be automatically redirected to this TF and when we are finished we will return to your application.
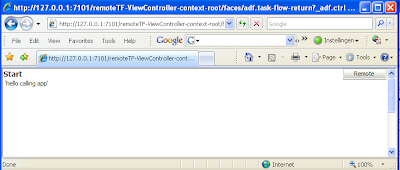
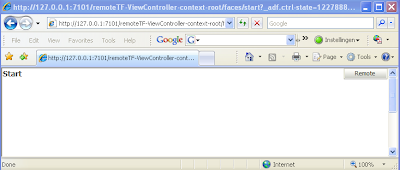
Here is an example where I can press the remote button, this will open the Remote TF. The url of my application starts with http://127.0.0.1:7101/remoteTF-ViewController...

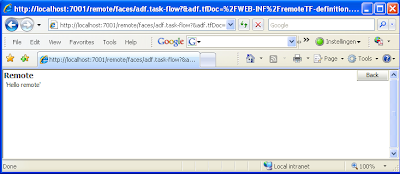
The remote TF is deployed to a WebLogic Application server, you can now see that the url of the TF is http://localhost:7001/remote/ . When we press back we will return to calling application


And we are back.
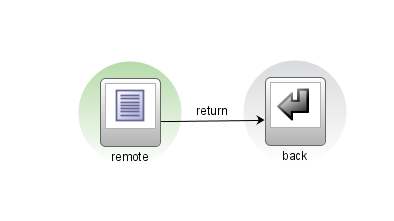
To do it yourself follow these steps. First create a new Application or ADF viewcontroller project. In the ViewController project we will create a bound task flow ( de-select the page fragments option). In this TF we add a view and a TF return component. Between these components we will add control flow case called return.

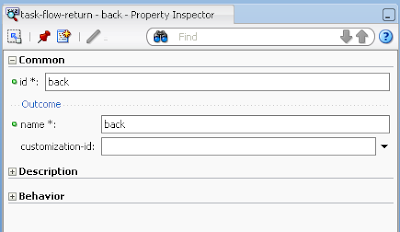
Select the task flow return component and provide a value to the name of Outcome. We need this value for the return control flow case of our calling application.

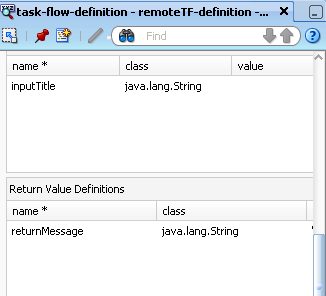
To make it more interesting let's add an input and a return parameter.

Deploy this TF to an application server. See this blog entry how to this. If you get a deployment error then it can help to remove the listener in the weblogic-application.xml. See the Oracle forums for more details.
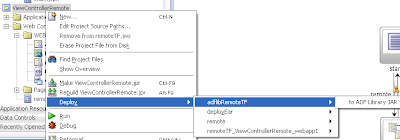
The next step is to add an ADF library deployment profile to your TF and deploy your TF code to a jar.


Now go to your calling application and add this jar as a library to theviewcontroller project.
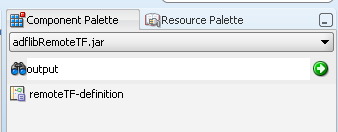
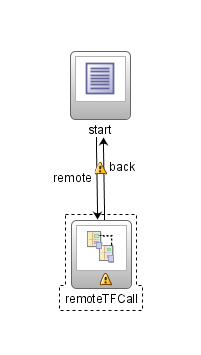
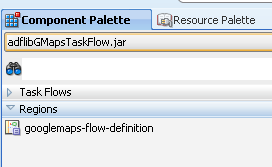
Open your unbounded Task Flow ( adfc-config.xml ). We can see the just created TF in the Component Palette and drag this TF to the unbounded TF


Let's add two control flow cases. The first called remote will open the remote TF and the second called back ( this need to have the same name as the outcome name of the task flow return component )
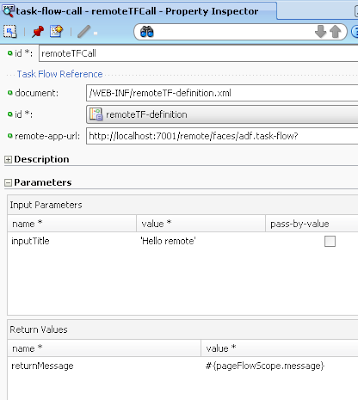
Because the remote TF is running on a other application server we need to provide the url. In my case http://localhost:7001/remote/faces/adf.task-flow? . This url must end with faces/adf.task-flow?.
This remote TF has an input and a return parameter so let's add a value to these parameters.

That's all. Here is the example workspace

Tuesday, December 23, 2008

Google Maps Task Flow

I made a stand alone google maps Task Flow which you can use as region in your jsf pages. This Task Flow is based on GMaps4JSF and you only have to fill the input parameters and the Task Flow will display you the location and popup the description of this location.
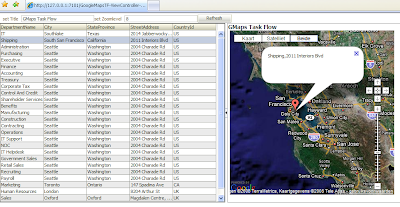
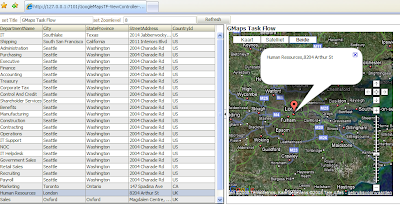
Here you see some examples where I use the department table of the HR schema as input.

This Task Flow has the following four input parameters.
1) inputParameterTitle: Display the Title
2) inputParameterLocation: The google maps location like London, UK
3) inputParameterDescription: Popup description of the location
4) inputParameterZoomLevel

Here the steps to integrate this Google maps Task Flow in your own Application.
1) Add the Task Flow jar to your own viewcontroller project. The jar is located in the deploy folder GmapsTaskFlow project.
2) Drag the task flow from the component palette to your page. This will add the region component to the jsf page and a task flow binding in the Page definition.

3) We need to add your own google maps api key to your jsf page. We need to do this in the metacontainer of af:document

<af:document>
<f:facet name="metaContainer">
<f:verbatim>
<![CDATA[
<script type="text/javascript" src="http://maps.google.com/maps?file=api&amp;v=2&amp;key=ABQIAAAAM7FSGSscPTbXiOt1No2LPRSLP72-OZgzlwHUle6cA--KWDlXYxSMtxkbiwjRJ9xjiVAYHIVo1d0VkA">
</script>
]]>
</f:verbatim>
</f:facet>

4) Fill the input parameters of this Task Flow and change the refresh condition to ifNeeded
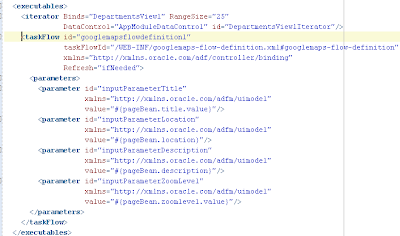
Open the PageDef of your page and add some values to the inputparameters.


that's all. Here is the google maps workspace with the Task Flow and a test project where I use this TF. ( It works on the HR schema ).

Here some code how to fill the location parameter in an ADF rich table by using your own selection listener.

public static Object invokeMethod(String expr, Class[] paramTypes,
Object[] params) {
FacesContext fc = FacesContext.getCurrentInstance();
ELContext elc = fc.getELContext();
ExpressionFactory ef = fc.getApplication().getExpressionFactory();
MethodExpression me =
ef.createMethodExpression(elc, expr, Object.class, paramTypes);
return me.invoke(elc, params);
}

public static Object invokeMethod(String expr, Class paramType,
Object param) {
return invokeMethod(expr, new Class[] { paramType },
new Object[] { param });
}

public void departmentSelectionListener(SelectionEvent selectionEvent) {
// Add event code here...
invokeMethod("#{bindings.DepartmentsView1.collectionModel.makeCurrent}",
SelectionEvent.class, selectionEvent);

DCBindingContainer bc = (DCBindingContainer) BindingContext.getCurrent().getCurrentBindingsEntry();
DCIteratorBinding iter = bc.findIteratorBinding("DepartmentsView1Iterator");
Row rw = iter.getCurrentRow();
location = rw.getAttribute("City").toString()+","+
rw.getAttribute("CountryId").toString();
if ( rw.getAttribute("StateProvince") != null ) {
location = location +","+rw.getAttribute("StateProvince").toString();
}
description = rw.getAttribute("DepartmentName").toString()+","+
rw.getAttribute("StreetAddress").toString();
}

Saturday, December 20, 2008

Charts in JDeveloper 10.1.3

With JDeveloper 11g you have many out of the box JSF graph components but too bad this isn't the case in JDeveloper 10.1.3. In this blog I will show you how you can have free graphs components and use it in 10.1.3.
First we need to download Chartcreator this is JSF tag library which works on jfreechart. With these two jars we can make the following charts pie ring timeseries xyline polar scatter xyarea xysteparea xystep bubble candlestick boxandwhisker highlow histogram wind bar stackedbar linearea stackedarea gantt waterfall

Here are some examples with ADF.


Add chartcreator as taglib to your project.
And add jfreechart and jcommon libraries to this project. We don't need the other libraries

Add the JSF chart component to your ADF page

<chart:chart id="ChartTimeseries"
datasource="#{backing_chart.timeDataset}"
type="timeseries" is3d="true" antialias="true"
title="Timeseries" xlabel="year"
ylabel="Total" height="300" width="300"/>
<chart:chart id="chartLine" datasource="#{backing_chart.dataset2}"
type="line" is3d="true" antialias="true"
title="Line" xlabel="year"
ylabel="Total" height="300" width="500"/>

We need a backing bean to provide the charts with data. Create and add a backing bean to the faces-config.xml


<?xml version="1.0" encoding="windows-1252"?>
<!DOCTYPE faces-config PUBLIC
"-//Sun Microsystems, Inc.//DTD JavaServer Faces Config 1.1//EN"
"http://java.sun.com/dtd/web-facesconfig_1_1.dtd">
<faces-config xmlns="http://java.sun.com/JSF/Configuration">
<managed-bean>
<managed-bean-name>backing_chart</managed-bean-name>
<managed-bean-class>nl.ordina.view.backing.Chart</managed-bean-class>
<managed-bean-scope>request</managed-bean-scope>
<managed-property>
<property-name>bindings</property-name>
<value>#{bindings}</value>
</managed-property>
</managed-bean>
<application>
<default-render-kit-id>oracle.adf.core</default-render-kit-id>
</application>
<lifecycle>
<phase-listener>oracle.adf.controller.faces.lifecycle.ADFPhaseListener</phase-listener>
</lifecycle>
</faces-config>

The chart backing bean code


package nl.ordina.view.backing;

import oracle.adf.model.binding.DCBindingContainer;
import oracle.adf.model.binding.DCIteratorBinding;

import oracle.jbo.Row;
import oracle.jbo.RowSetIterator;
import oracle.jbo.domain.Number;

import org.jfree.data.category.DefaultCategoryDataset;
import org.jfree.data.general.DefaultPieDataset;
import org.jfree.data.time.TimeSeries;
import org.jfree.data.time.TimeSeriesCollection;
import org.jfree.data.time.Year;

public class Chart {
private DCBindingContainer bindings;
private DefaultPieDataset pieDataSet;
private DefaultCategoryDataset dataset2;

public DefaultPieDataset getPieDataSet() {
return pieDataSet;
}

public DefaultCategoryDataset getDataset() {

DefaultCategoryDataset dataset = new DefaultCategoryDataset();
pieDataSet = new DefaultPieDataset();
DCBindingContainer bc = getBindings();
if (bc != null) {
DCIteratorBinding normIter =
bc.findIteratorBinding("DepartmentEmployeesCountIterator");

RowSetIterator rsi = normIter.getRowSetIterator();
String[] attNames = rsi.getRowAtRangeIndex(0).getAttributeNames();

int departmentIdNum = 0;
int totalNum = 0;

for (int j = 0; j < attNames.length; j++) {
if (attNames[j].equalsIgnoreCase("DepartmentId")) {
departmentIdNum = j;
} else if (attNames[j].equalsIgnoreCase("Total")) {
totalNum = j;
}
}

for (int i = 0; i < rsi.getRowCount(); i++) {
Row currentRow = rsi.getRowAtRangeIndex(i);
Object[] attValues = currentRow.getAttributeValues();
Number departmentIdValue = (Number)attValues[departmentIdNum];
Number totalValue = (Number)attValues[totalNum];

pieDataSet.setValue(departmentIdValue.toString(),
totalValue.toDouble(totalValue.getBytes()));
dataset.addValue(totalValue.toDouble(totalValue.getBytes()),
"Employees", departmentIdValue.toString());
}
}
return dataset;
}

public DefaultCategoryDataset getDataset2() {
return dataset2;
}

public TimeSeriesCollection getTimeDataset() {

dataset2 = new DefaultCategoryDataset();
TimeSeries s1 = new TimeSeries("Year", Year.class);

DCBindingContainer bc = getBindings();
if (bc != null) {
DCIteratorBinding normIter =
bc.findIteratorBinding("EmployeeHireYearIterator");

RowSetIterator rsi = normIter.getRowSetIterator();
String[] attNames = rsi.getRowAtRangeIndex(0).getAttributeNames();

int yearNum = 0;
int totalNum = 0;

for (int j = 0; j < attNames.length; j++) {
if (attNames[j].equalsIgnoreCase("Year")) {
yearNum = j;
} else if (attNames[j].equalsIgnoreCase("Total")) {
totalNum = j;
}
}

for (int i = 0; i < rsi.getRowCount(); i++) {
Row currentRow = rsi.getRowAtRangeIndex(i);
Object[] attValues = currentRow.getAttributeValues();
String yearValue = (String)attValues[yearNum];
Number totalValue = (Number)attValues[totalNum];

s1.add(new Year(new Integer(yearValue)),
totalValue.toDouble(totalValue.getBytes()));

dataset2.addValue(totalValue.toDouble(totalValue.getBytes()),
"Employees", yearValue.substring(2));


}
}
TimeSeriesCollection dataset = new TimeSeriesCollection();
dataset.addSeries(s1);
return dataset;
}

public void setBindings(DCBindingContainer bindings) {
this.bindings = bindings;
}

public DCBindingContainer getBindings() {
return bindings;
}
}


Here you have my example project which works on the HR demo database schema

Wednesday, December 17, 2008

Using database tables as authentication provider in WebLogic

In WebLogic you can use database tables as authentication provider for your web applications. In these tables you can store your application users with its roles. WebLogic will use these tables for your application authentication. WebLogic even provides you a web interface where you can add or change users / roles.
You can use this SQL authenticator for your container security or use it for your JDeveloper 11G ADF security. For more info over ADF security see my previous blog. This SQL authenticator replaces the dbloginmodule of the OC4J container which was available in the Technical Previews of JDeveloper 11g.
First we need to have some authorization tables. I will use the user and roles tables of JHeadstart. Here is the ddl with some sample users.

CREATE TABLE JHS_ROLES
(
ID NUMBER(*, 0) NOT NULL,
ORG_KEY VARCHAR2(30) DEFAULT 'DEFAULT' NOT NULL,
SHORT_NAME VARCHAR2(10) NOT NULL,
NAME VARCHAR2(40) NOT NULL
);

CREATE TABLE JHS_USER_ROLE_GRANTS
(
ID NUMBER(*, 0) NOT NULL,
USR_ID NUMBER(*, 0) NOT NULL,
RLE_ID NUMBER(*, 0) NOT NULL
);

CREATE TABLE JHS_USERS
(
ID NUMBER(*, 0) NOT NULL,
EMAIL_ADDRESS VARCHAR2(240),
USERNAME VARCHAR2(240) NOT NULL,
ORG_KEY VARCHAR2(30) DEFAULT 'DEFAULT',
PASSWORD VARCHAR2(240),
DISPLAY_NAME VARCHAR2(240),
LOCALE VARCHAR2(10)
);

ALTER TABLE JHS_ROLES
ADD CONSTRAINT JHS_RLE_PK PRIMARY KEY
( ID ) ENABLE;

ALTER TABLE JHS_ROLES
ADD CONSTRAINT JHS_RLE_UK1 UNIQUE
( SHORT_NAME,ORG_KEY ) ENABLE;

ALTER TABLE JHS_USER_ROLE_GRANTS
ADD CONSTRAINT JHS_URG_PK PRIMARY KEY
( ID ) ENABLE;

ALTER TABLE JHS_USER_ROLE_GRANTS
ADD CONSTRAINT JHS_URG_UK1 UNIQUE
( RLE_ID, USR_ID ) ENABLE;

ALTER TABLE JHS_USERS
ADD CONSTRAINT JHS_USR_PK PRIMARY KEY
( ID ) ENABLE;

CREATE SEQUENCE JHS_SEQ INCREMENT BY 1 MAXVALUE 999999999999999999999999999 MINVALUE 1 CACHE 20 ;

-- Create two users SKING and AHUNOLD
insert into jhs_users (ID, EMAIL_ADDRESS, USERNAME, ORG_KEY, PASSWORD, DISPLAY_NAME)
select jhs_seq.nextval,'SKING','SKING','DEFAULT','SKING', 'Steven King'
from dual
where not exists (select '1' from jhs_users where username='SKING');

insert into jhs_users (ID, EMAIL_ADDRESS, USERNAME, ORG_KEY, PASSWORD, DISPLAY_NAME)
select jhs_seq.nextval,'AHUNOLD','AHUNOLD','DEFAULT','AHUNOLD', 'Alexander Hunold'
from dual
where not exists (select '1' from jhs_users where username='AHUNOLD');

-- set up two roles: Administrator and User
insert into jhs_roles(id, SHORT_NAME, name)
select jhs_seq.nextval, 'ADMIN','Administrator'
from dual
where not exists (select '1' from jhs_roles where short_name='ADMIN');

insert into jhs_roles(id, SHORT_NAME, name)
select jhs_seq.nextval, 'USER','User'
from dual
where not exists (select '1' from jhs_roles where short_name='USER');

-- Make Steven King Administrator
insert into jhs_user_role_grants (id,rle_id,usr_id)
select jhs_seq.nextval, rle.id, usr.id
from jhs_roles rle, jhs_users usr
where rle.short_name='ADMIN'
and usr.username='SKING'
and not exists (select '1' from jhs_user_role_grants urg2
where urg2.usr_id = usr.id
and urg2.rle_id = rle.id);

-- Make Alexander Hunold User
insert into jhs_user_role_grants (id,rle_id,usr_id)
select jhs_seq.nextval, rle.id, usr.id
from jhs_roles rle, jhs_users usr
where rle.short_name='USER'
and usr.username='AHUNOLD'
and not exists (select '1' from jhs_user_role_grants urg2
where urg2.usr_id = usr.id
and urg2.rle_id = rle.id);

commit;

Now we can add the SQL authenticator provider in WebLogic. First we need to create a datasource for the database connection and remember the datasource name ( not the jndi name) We needs this value for the provider.

Select the Security Realms link then I will select the default realm "myrealm" and go to providers tab. Here we can create a new authentication provider.
We need to select SQLAuthenticator as Type
Select your just created provider and change the Control flag to sufficient. After this we can go to the provider specific tab where we can add the details of the provider.
We need to fill in the datasource name, select a password algorithm and add many SQL statements.Here are my settings for the jheadstart tables.
Go to this folder MiddlewareJdev11g\jdeveloper\system\system11.1.1.0.31.51.88\DefaultDomain\config and change the config.xml file where you can replace your values with this

<sec:authentication-provider xsi:type="wls:sql-authenticatorType">
<sec:name>DB_users</sec:name>
<sec:control-flag>SUFFICIENT</sec:control-flag>
<wls:enable-group-membership-lookup-hierarchy-caching>false</wls:enable-group-membership-lookup-hierarchy-caching>
<wls:data-source-name>scott</wls:data-source-name>
<wls:plaintext-passwords-enabled>true</wls:plaintext-passwords-enabled>
<wls:sql-get-users-password>SELECT password FROM jhs_users WHERE username = ?</wls:sql-get-users-password>
<wls:sql-user-exists>SELECT username FROM jhs_users WHERE username = ?</wls:sql-user-exists>
<wls:sql-list-member-groups>SELECT short_name FROM jhs_user_role_grants g ,jhs_roles r,jhs_users u WHERE g.usr_id = u.id and g.rle_id = r.id and u.username = ?</wls:sql-list-member-groups>
<wls:sql-list-users>SELECT username FROM jhs_users WHERE username LIKE ?</wls:sql-list-users>
<wls:sql-get-user-description>SELECT display_name FROM jhs_users WHERE username = ?</wls:sql-get-user-description>
<wls:sql-list-groups>SELECT short_name FROM jhs_roles WHERE short_name LIKE ?</wls:sql-list-groups>
<wls:sql-group-exists>SELECT short_name FROM jhs_roles WHERE short_name = ?</wls:sql-group-exists>
<wls:sql-is-member>SELECT u.username FROM jhs_user_role_grants g ,jhs_users u WHERE u.id = g.usr_id and rle_id = ( select id from jhs_roles where short_name = ? ) AND usr_id = ( select id from jhs_users where username = ? )</wls:sql-is-member>
<wls:sql-get-group-description>SELECT name FROM jhs_roles WHERE short_name = ?</wls:sql-get-group-description>
<wls:password-style>PLAINTEXT</wls:password-style>
<wls:sql-create-user>INSERT INTO jhs_users ( id,username , password , display_name) VALUES (jhs_seq.nextval, ? , ? , ? )</wls:sql-create-user>
<wls:sql-remove-user>DELETE FROM jhs_users WHERE username = ?</wls:sql-remove-user>
<wls:sql-remove-group-memberships>DELETE FROM jhs_user_role_grants WHERE rle_id = ( select id from jhs_roles where short_name = ? ) or usr_id = ( select id from jhs_users where username = ? )</wls:sql-remove-group-memberships>
<wls:sql-set-user-description>UPDATE jhs_users SET display_name = ? WHERE username = ?</wls:sql-set-user-description>
<wls:sql-set-user-password>UPDATE jhs_users SET password = ? WHERE username = ?</wls:sql-set-user-password>
<wls:sql-create-group>insert into jhs_roles(id, short_name, name) values (jhs_seq.nextval, ?, ?)</wls:sql-create-group>
<wls:sql-set-group-description>UPDATE jhs_roles SET name = ? WHERE short_name = ?</wls:sql-set-group-description>
<wls:sql-add-member-to-group>INSERT INTO jhs_user_role_grants (id,rle_id,usr_id) VALUES( jhs_seq.nextval , ( select id from jhs_roles where short_name = ?),(select id from jhs_users where username = ?))</wls:sql-add-member-to-group>
<wls:sql-remove-member-from-group>DELETE FROM jhs_user_role_grants WHERE rle_id = ( select id from jhs_roles where short_name = ? ) AND usr_id = ( select id from jhs_users where username = ? )</wls:sql-remove-member-from-group>
<wls:sql-remove-group>DELETE FROM jhs_roles WHERE short_name = ?</wls:sql-remove-group>
<wls:sql-remove-group-member>DELETE FROM jhs_user_role_grants WHERE rle_id = ( select id from jhs_roles where short_name = ? )</wls:sql-remove-group-member>
<wls:sql-list-group-members>SELECT username FROM jhs_user_role_grants g ,jhs_roles r,jhs_users u WHERE g.usr_id = u.id and g.rle_id = r.id and r.short_name = ? and u.username like ?</wls:sql-list-group-members>
</sec:authentication-provider>

We need to restart the WebLogic server. After the reboot we can go the User and Group tab of your default security realm where we can change or add users and roles. Here is an overview where we can see SKING
When we select SKING we can add roles to this user.
Now we can test it, ( see my previous blog for more details)

Here the result of the authentication

Monday, December 15, 2008

Using a WebLogic provider as authentication for ADF Security in 11G

With ADF Security of Jdeveloper 11g you can use ldap or a table as authentication provider in WebLogic. To make for example a new ldap provider see my blog or the one of Frank Nimphius.
Next blog I will show you how can use user and group tables as a provider in WLS.

First before we the ADF Security wizard we first need to configure WebLogic. I will using the internal WLS server of JDeveloper 11G. Start the instance and go to http://localhost:7101/console/ Go to the security realms. Default is your realm 'myrealm' and not jazn.com.


Go to your security provider and change the Control flag from optional to sufficient. Then this provider is used in the authentication process

Change the default authenticator from required to sufficient else the provider will never be used.


Now we can run the ADF Security wizard in JDeveloper 11g

Just use a authentication type


Now choose LDAP


Just fill in some values, it does not matter. ADF wil use the WebLogic LDAP provider

And we are finished with the wizard.

Change the weblogic.xml where we will map valid-users to users (Users is a role in WLS )


<?xml version = '1.0' encoding = 'windows-1252'?>

<weblogic-web-app xmlns:xsi="http://www.w3.org/2001/XMLSchema-instance" xsi:schemaLocation="http://www.bea.com/ns/weblogic/weblogic-web-app.xsd" xmlns="http://www.bea.com/ns/weblogic/weblogic-web-app">

<security-role-assignment>

<role-name>valid-users</role-name>

<principal-name>users</principal-name>

</security-role-assignment>

</weblogic-web-app>


Now we have tto change the jazn-data.xml where we will add the realm and add the roles.

These roles will be used in the page authorization.

We need to use myrealm as realm and not jazn.com. Create the valid-users role


Create a valid-users application role

Now open the pagedef of the JSF page and add a security policy to this page or you can open the jazn-data.xml and select the page.

Select the page and select a role where we add actions to this role.

Now run your application and authenticate against the WebLogic provider


Here is the final result.


Probably this will change in other 11G versions where the ADF Security wizard will configure WLS.

Friday, December 5, 2008

Deploy your 11G webapp to a WebLogic Server

Deploying your web application from JDeveloper 11g to a WebLogic 10.3 Server is not so simple as with the internal WebLogic server of JDeveloper. Off course we need to install the WebLogic 10.3 and install the ADF runtime 11g to this server ( See my previous blog for this ).

The first step is to create the datasource in WebLogic. In the configuration of the ADF BC applications modules you can see what should be the jndi name in WLS. Default is this, the database connection name of the application with DS. For example database connection = scott then the jndi name will be jdbc/scottDS

Create the jdbc datasource in WLS

Very important, you must enable this datasource by selecting a target. Default the target is not selected and the datasource is disabled.
Add a war deployment to your application.
Give the application a root context.
Now we need to add a ear deployment to your application.

You have to select the just created war deployment profile. In the ear deployment contains the weblogic-deployment.xml where is defined that this application needs the adf 11g library
Now we can deploy the ear to WebLogic server
Here the result of the deployment
In the deployment view we can see our application with its j2ee modules
In the ADF 11g library deployment we can see the just deployed application as a reference to this library